Cell staining is a technique that uses chemical or other methods to color cells. It can intuitively understand cell growth status, morphology and other cell characteristics as well as the molecular expression level and location. It includes cell immunochemical staining, cell immunofluorescence staining, EdU/BrdU staining, TUNEL staining, etc.
I. Cell immunochemical staining
1. Experimental principle
The principle of immunocytochemical staining (Immunocytochemistry, ICC) is to introduce exogenous antibodies (or antigens) with markers to anchor them to the corresponding antigen (or antibody) sites in the cell specimen. The markers react with color to display the antigen (or antibody) to be tested. According to the different markers, it can be divided into: immunoenzyme cell chemical staining, immunofluorescence cell chemical staining, etc.
2. Experimental principle diagram
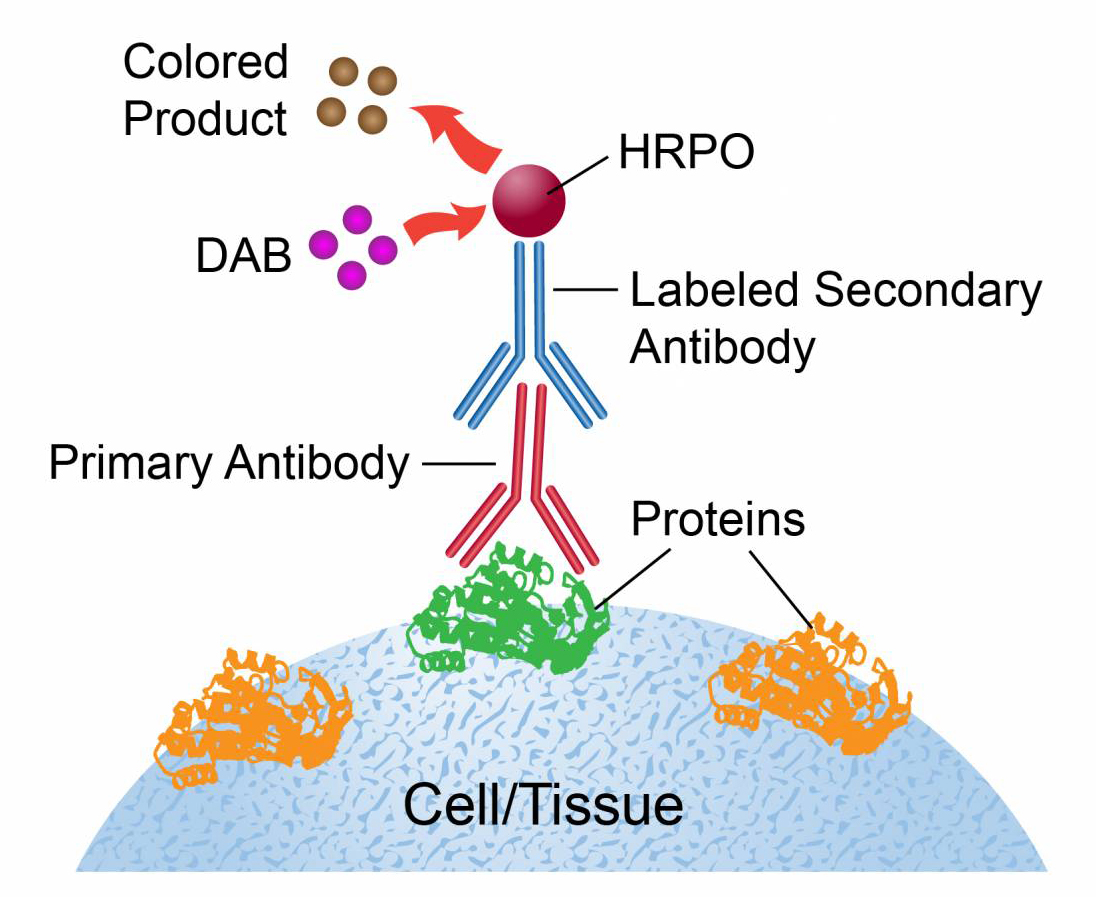
3. Experimental steps
3.1 Take cells in the logarithmic growth phase, inoculate them in a 24-well plate at a density of 2×10⁵/mL, mix them to form a single cell layer, and culture them in a 37 ℃, 5% CO2 incubator for 24 h;
3.2 Discard the culture medium, rinse with PBS 3 times, and fix with 95% acetone for 10 min;
3.3 Rinse with PBS 3 times, 2 min each time;
3.4 Permeabilize with 0.3% Triton X-100 for 15 min;
3.5 Rinse with PBS 3 times, 2 min each time;
3.6 Add 10% sheep serum to block, incubate at 37 ℃ for 30 min;
3.7 Aspirate the supernatant, add primary antibody, place in a wet box, react at 37 ℃ for 1 h or in a 4 ℃ refrigerator overnight;
3.8 Rinse with PBS 3 times, 2 min each time;
3.9 Add polymerase-labeled HRP secondary antibody, incubate at room temperature for 30 min;
3.10 Rinse with PBS 3 times, 2 min each time;
3.11 Add DAB (3,3-dioxadiphenylamine) to develop color for 10 min;
3.12 Add PBS to wash twice to terminate the color reaction;
3.13 Add hematoxylin for 2 min, wash once with PBS, quickly differentiate with hydrochloric acid alcohol, and wash once with PBS;
3.14 Observe under a microscope and take pictures.
4. Example of experimental results
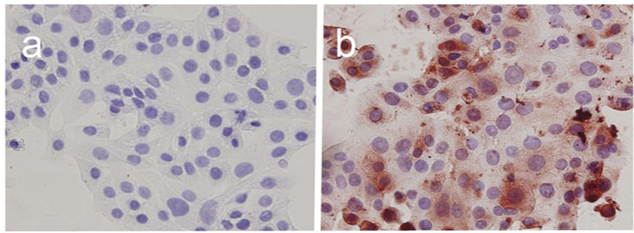
Figure a is the control group, where only the cell nucleus was stained purple; Figure b is the experimental group, where the cytoplasm was stained brown after the addition of HMOCC-1 primary antibody and enzyme-labeled HRP secondary antibody.
II. Cellular Immunofluorescence Staining
1. Experimental Principle
The experimental principle of cellular immunofluorescence (IF) is to label known antibodies or antigens with fluorescein, use this specific reagent to stain cell specimens containing the corresponding antigen or antibody, and use the specific binding of antigen and antibody to show fluorescence at the site where the antigen or antibody exists, thereby locating the antigen or antibody in the cell.
2. Experimental Principle Diagram
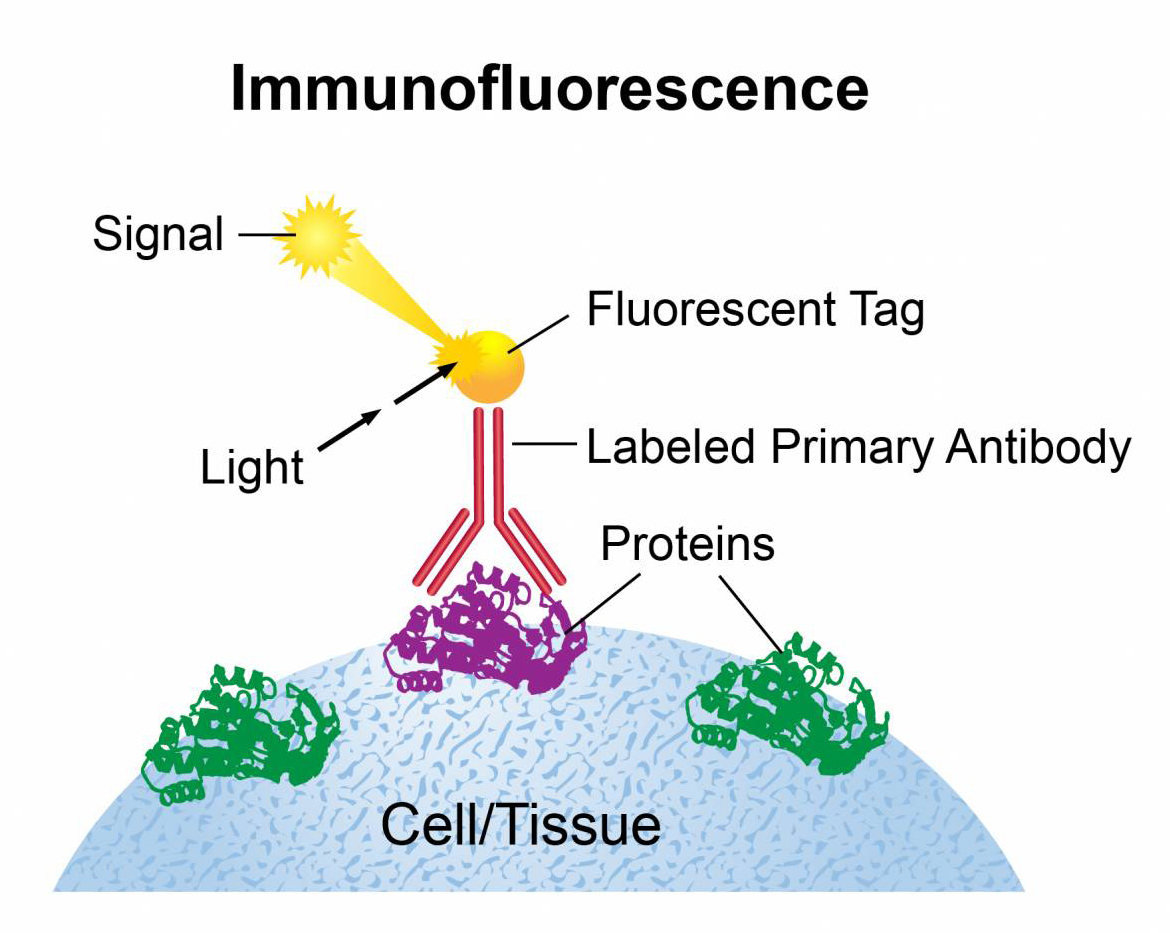
3. Experimental steps
3.1 Place the slide in a 24-well culture plate and add cells in the logarithmic growth phase. When the cells grow into a monolayer, remove the slide and wash it twice with PBS (the cells growing in suspension are centrifuged and washed twice with PBS to make a cell smear);
3.2 Discard the cell culture supernatant and wash with PBS;
3.3 Fix the slide with 4% paraformaldehyde for 15 min;
3.4 Wash with PBS 3 times, 5 min each time;
3.5 Permeabilize with 0.5% Triton X-100 for 5 min and block the cells in blocking buffer for 60 min;
3.6 Aspirate the blocking buffer, add the diluted primary antibody, and incubate at 4 °C overnight;
3.7 Rinse with PBS 3 times, 5 min each time;
3.8 Add the diluted secondary antibody and incubate in a wet box at room temperature for 1 h in the dark;
3.9 Rinse with PBS 3 times, 5 min each time;
3.10 Add 1×DAPI and incubate in the dark for 10 min, then rinse with PBS 3 times, 5 min each time;
3.11 Use absorbent paper to absorb the liquid on the slide, seal the slide with a sealing solution containing anti-fluorescence quencher, and then observe and collect images under a fluorescence microscope.
4. Example of experimental results
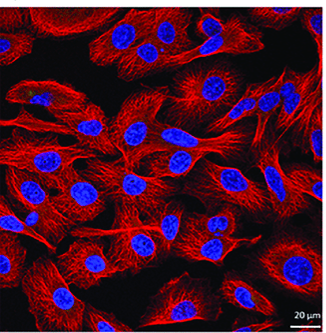
The cell nucleus was stained blue by DAPI, while the proteins in the cytoplasm were detected by specific antibodies and appeared red under a fluorescence microscope.
III. BrdU/EdU staining
1. Experimental principle
BrdU (5-Bromo-2'-deoxuridine) is a derivative of thymine, which can replace thymine and selectively integrate into newly synthesized DNA (S phase of the cell cycle). This incorporation can exist stably and enter daughter cells as DNA replicates. The incorporated BrdU can be detected using BrdU-specific antibodies. EdU (5-Ethynyl-2'-deoxyuridine) is a thymine nucleoside analog that can replace thymine and be incorporated into the synthesizing DNA molecules during the DNA replication period. Based on the specific reaction of Apollo® fluorescent dye and EdU, cells in the proliferation phase can be directly detected.

Although both BrdU and EdU methods can detect proliferating cells, they are different. BrdU antibodies are large, and DNA must be partially denatured to form single strands before they can bind to BrdU and complete the detection; EdU is only 1/500 of the size of BrdU antibodies, and is easier to diffuse in cells. It can be effectively detected without DNA denaturation, which can effectively avoid sample damage, and has higher sensitivity and faster detection speed.
2. Experimental principle diagram

BrdU staining principle△

EdU staining principle
3. Experimental steps
3.1 BrdU staining
3.1.1 Cells were inoculated at 1.5×10⁵/mL in a 35 mm diameter culture dish (with a coverslip inside), cultured for 24 h, and synchronized with a culture medium containing 0.4% FBS for 3 days, so that most cells were in the G0 phase;
3.1.2 BrdU was added to make the final concentration of BrdU 0.03 μg/mL, and incubated in a 37 ℃, 5% CO2 cell culture incubator for 1 h;
3.1.3 The culture medium was discarded, the slides were washed 3 times with PBS, and fixed with 4% paraformaldehyde for 30 min;
3.1.4 After washing 3 times with PBS, 2 mol/L HCL was added, and denatured at 37 ℃ for 5 min;
3.1.5 0.1 mol/L sodium borate was added to neutralize for 10 min, and PBS was washed 3 times;
3.1.6 0.2% Triton X-100 was added to permeabilize for 10 min;
3.1.7 Wash 3 times with PBS, add 3% BSA and block at room temperature for 1 h;
3.1.8 Wash 3 times with PBS, add BrdU antibody and incubate at 4°C overnight;
3.1.9 Wash 3 times with PBS, add secondary antibody and incubate at room temperature in the dark for 1 h;
3.1.10 Wash 3 times with PBS, add 1× Hoechst 33342 and incubate in the dark for 10 min;
3.1.11 Wash 3 times with PBS and observe and take pictures under a fluorescence microscope.
3.2 EdU staining
3.2.1 EdU labeling, fixation, washing and permeabilization of cultured cells
3.2.1.1 Take cells in logarithmic growth phase and inoculate them into 96-well plates at 1×10⁵ cells per well (the specific density depends on the growth rate of the cells). After the cells return to normal, perform the required drug treatment or other stimulation treatment;
3.2.1.2 Prepare 2× EdU working solution, preheat at 37℃, and add equal volume to the 96-well plate to make the final EdU concentration in the 96-well plate 1×. Replacing all the culture medium may affect the proliferation of cells, so it is not recommended to replace all the culture medium;
3.2.1.3 Continue to incubate the cells for 2 h. The length of the incubation time depends on the cell growth rate, and the incubation time is usually about 10% of the cell cycle;
3.2.1.4 After the EdU labeling of cells is completed, the culture medium is discarded, and 1 mL of fixative solution is added and fixed at room temperature for 15 min;
3.2.1.5 Discard the fixative solution, wash the cells 3 times with 1 mL of washing solution per well, 5 min each time;
3.2.1.6 Discard the washing solution, incubate each well with 1 mL of permeabilization solution at room temperature for 15 min;
3.2.1.7 Discard the permeabilization solution, wash the cells 2 times with 1 mL of washing solution per well, 5 min each time;
3.2.2 EdU detection
The reaction system of each well in the 96-well plate is 50 μL of reaction mixture, and the reaction mixture systems corresponding to 6, 12, 24, 48 and 384-well plates are 500 μL, 200 μL, 100 μL, 70 μL and 20 μL, respectively.
3.2.2.1 Remove the washing solution from the above wells and add 50 μL Click reaction solution to each well (refer to the component sequence and volume in the table below to prepare the Click reaction solution, and use it within 15 minutes after preparation). Gently shake the culture plate to ensure that the reaction mixture can evenly cover the sample;

3.2.2.2 Incubate at room temperature in the dark for 30 min;
3.2.2.3 Remove the Click reaction solution and wash with washing solution 3 times, 5 minutes each time;
3.3.3 Nuclear staining
In order to detect the proportion of cell proliferation, you can consider using Hoechst 33342 for nuclear staining;
3.3.3.1 After removing the washing solution, add 1 mL of 1× Hoechst 33342 solution to each well and incubate at room temperature in the dark for 10 min;
3.3.3.2 Remove the 1× Hoechst 33342 solution;
3.3.3.3 Wash with washing solution 3 times, 5 minutes each time;
3.3.3.4 Then you can perform fluorescence detection. Hoechst 33342 is a blue fluorescence with a maximum excitation wavelength of 346 nm and a maximum emission wavelength of 460 nm.
4. Example of results
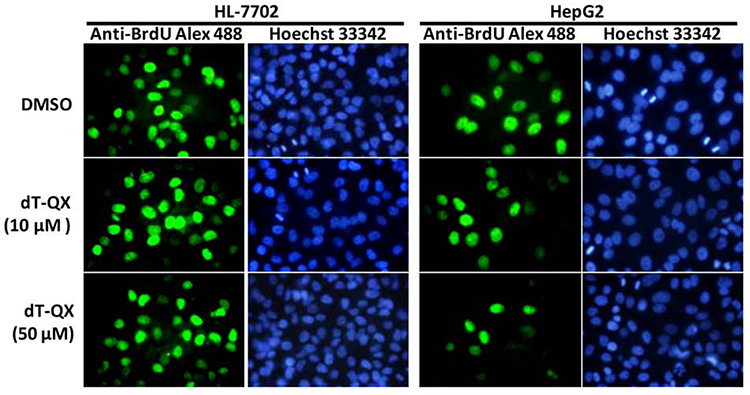
Under a fluorescent microscope, Hoechst 33342 dyes the cell nucleus blue; the BrdU antibody binds to BrdU incorporated into the cell DNA and appears green. The proportion of BrdU positively stained cells was significantly reduced after treatment with dT-QX.
IV. TUNEL staining
1. Experimental principle
TUNEL staining is TdT-mediated Dutp Nick-End Labeling. Its principle is that dUTP labeled with fluorescence or biotin can be connected to the 3'-OH end of the broken DNA in apoptotic cells under the action of deoxyribonucleotidyl transferase (TdT Enzyme), and then through fluorescence excitation or chemical color development methods, apoptotic cells can be specifically and accurately detected, while normal or proliferating cells have almost no DNA breaks, so no 3'-OH is formed and can rarely be stained.
2. Experimental principle diagram

3. Experimental steps
3.1 After treating the cells according to the experimental requirements, wash them once with PBS;
3.2 Fix them with 4% paraformaldehyde for 30 min;
3.3 Wash them once with PBS;
3.4 Add 0.2% Triton X-100 and incubate them in an ice bath for 2 min;
3.5 Add TUNEL reaction mixture, cover with a coverslip, place in a dark humid box, and incubate at 37 ℃ for 1 h;

3.6 Rinse with PBS for 3 times;
3.7 Add DAPI and incubate in the dark for 10 min;
3.8 After washing with PBS for 3 times, observe and take pictures under a fluorescence microscope.
4. Experimental results examples

Under a fluorescence microscope, the cell nucleus showed blue fluorescence and apoptotic cells showed green fluorescence.
References
[1] Jain D, Nambirajan A, Borczuk A, Chen G, Minami Y, Moreira AL, Motoi N, Papotti M, Rekhtman N, Russell PA, Savic Prince S, Yatabe Y, Bubendorf L; IASLC Pathology Committee. Immunocytochemistry for predictive biomarker testing in lung cancer cytology. Cancer Cytopathol. 2019 May;127(5):325-339.
[2] Kyuseok, Im, Sergey, et al. An Introduction to Performing Immunofluorescence Staining.[J]. Methods in Molecular Biology, 2019.
[3] Harris L, Zalucki O, Piper M. BrdU/EdU dual labeling to determine the cell-cycle dynamics of defined cellular subpopulations. J Mol Histol. 2018 Jun;49(3):229-234.
[4] Moore C L, Savenka A V, Basnakian A G. TUNEL Assay: A Powerful Tool for Kidney Injury Evaluation[J]. International Journal of Molecular Sciences, 2021, 22(1):412.
[5] Loo D T. In situ detection of apoptosis by the TUNEL assay: an overview of techniques.[J]. Methods in Molecular Biology, 2011, 682:3-13.
[6] Sharma R, Iovine C, A Ga Rwal A, et al. TUNEL assay—Standardized method for testing sperm DNA fragmentation[J]. Andrologia, 2020(4).