Part I Matrigel - General Knowledge
1. Matrigel classification
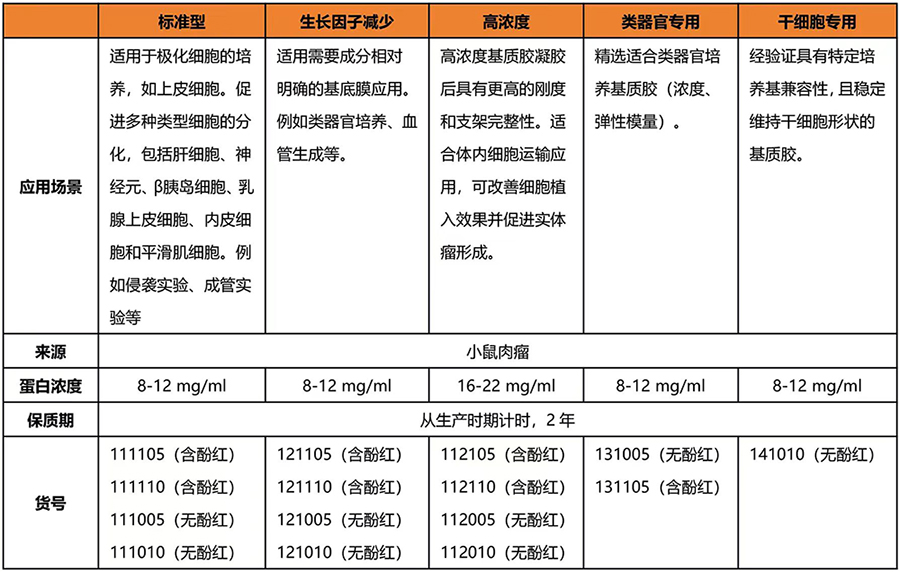
Matrigelin is mainly divided into five categories (Table 1), namely standard, growth factor reduced (GFR), high concentration (HC), organoid and embryonic stem cell (ESC).
2. Which type of matrigel should I purchase?
2.1 Standard matrigel is suitable for the culture of polarized cells, such as epithelial cells. It promotes the differentiation of various types of cells, including hepatocytes, neurons, β-islet cells, mammary epithelial cells, endothelial cells and smooth muscle cells. For example, invasion experiments, tube formation experiments, etc.
2.2 Cytokine-reduced matrigel is suitable for experiments that require relatively clear matrigel components, such as organoid culture, angiogenesis, stem cell culture, etc.
2.3 High concentration matrigel is suitable for in vivo tumor formation (CDX, PDX and PDOX) and in vivo angiogenesis (Plug A assay), etc. High-concentration matrix gel has a fast gelation speed, high gel rigidity, and better scaffold effect (Cell Scaffold).
2.4 Organoid-specific matrix gel belongs to the cytokine-reducing subtype, has a higher concentration and rigidity, and has been tested by mouse small intestinal organoid culture, and can reproduce the budding phenotype and molecular marker expression characteristics of small intestinal organoids.
2.5 Embryonic stem cell-specific matrix gel is a matrix gel that has been verified to have specific culture medium compatibility and stably maintain the shape and dryness of stem cells.
Table 1 Classification and application scenarios of matrix gel
3. How to store, thaw, transport and subpackage the matrix gel?
Storage: The matrix gel is usually stored in a refrigerator without defrosting function at -20℃;
Thawing: Half bury the matrix gel bottle in crushed ice and place it in a refrigerator at 2-8℃ overnight;
Transportation: Dry ice logistics transportation;
Subpackage: Subpackage according to the amount of matrix gel used in each round of experiments, and store it in a refrigerator without defrosting function at -20℃ after subpackage to avoid repeated freezing and thawing.
4. Do reagents and consumables need to be precooled before using matrix gel?
Since matrix gel will polymerize in an irreversible form to form gel at an ambient temperature above 8℃, during the operation of matrix gel, reagents (culture solution, diluent, cell suspension, etc.) and consumables (pipette tips, culture dishes, EP tubes and tube racks, etc.) are required to be precooled and operated on ice.
5. What is the color and state of matrix gel?
In the frozen state, the color of the matrix gel containing phenol red is usually light orange-red, and the matrix gel without phenol red is white like crushed ice; after thawing, the matrix gel containing phenol red is purple-red. After thawing, the high-concentration matrix gel without phenol red is a translucent thick turbid liquid, and the low-concentration matrix gel is a nearly transparent liquid.

6. What should I do if there is precipitation in the matrix gel?
If a small amount of precipitation is found in the matrix gel, it is recommended to use it after low-speed centrifugation at 4℃, which usually does not affect the activity of the matrix gel.
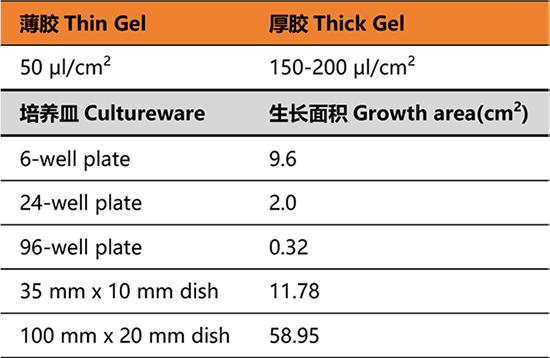
7. When coating culture dishes, how much matrix gel should be used?
Table 2 Guidelines for the amount of matrix gel coated culture dishes
Part II Matrigel - Experimental
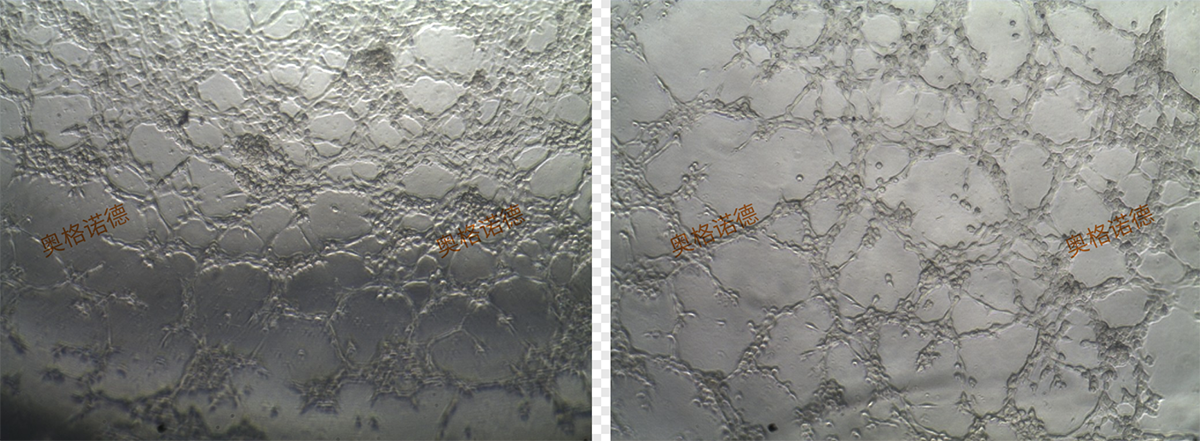
1. Tube Formation Assay
1.1 Experimental Purpose
Tube Formation Assay is a classic method for studying angiogenesis in vitro. This method can quickly determine the genes, small molecules or signaling pathways that regulate angiogenesis. Combined with Calcein staining and Image J analysis tools, quantitative analysis of angiogenesis can be achieved.
1.2 Experimental Steps
1.2.1 Coating: After the matrix gel is thawed, add 50-60μl per well to the pre-cooled 96-well plate culture wells (try to avoid bubbles in the matrix gel), and gently shake the culture plate to evenly spread the matrix gel on the bottom of the culture well; then place it in a 37℃ cell culture incubator for polymerization for 30 minutes.
1.2.2 Cell Preparation: Digest HUVEC cells in logarithmic growth phase culture and prepare them into a 2E+5 cell/ml suspension (the count must be accurate).
1.2.3 Inoculation: After the cells are mixed and counted, the cells are inoculated into the reported culture wells, 100μl per well, and after gently shaking, they are placed in a 37℃ cell culture incubator for continued culture.
1.2.4 Observation: After 6h of culture (or other specified time points), observe the tube formation under a microscope and collect photos at the same time.
1.3 Precautions
1.3.1 For the endothelial cell tube formation experiment, it is recommended to use the standard type (Cat. No.: 111105) or cytokine-reduced type (Cat. No.: 121105) matrix gel, and the gel concentration is 8-10mg/ml.
1.3.2 In addition to selecting the appropriate matrix gel for in vitro angiogenesis experiments, the state of endothelial cells is also extremely critical. It is recommended to select cells of 3-5 generations for the experiment. Pay attention to the cell state (logarithmic growth phase) and starve culture before plating. At the same time, the number of cells inoculated should not be too sparse or too dense.
1.4 Result examples
2. Invasion assay
2.1 Experimental purpose
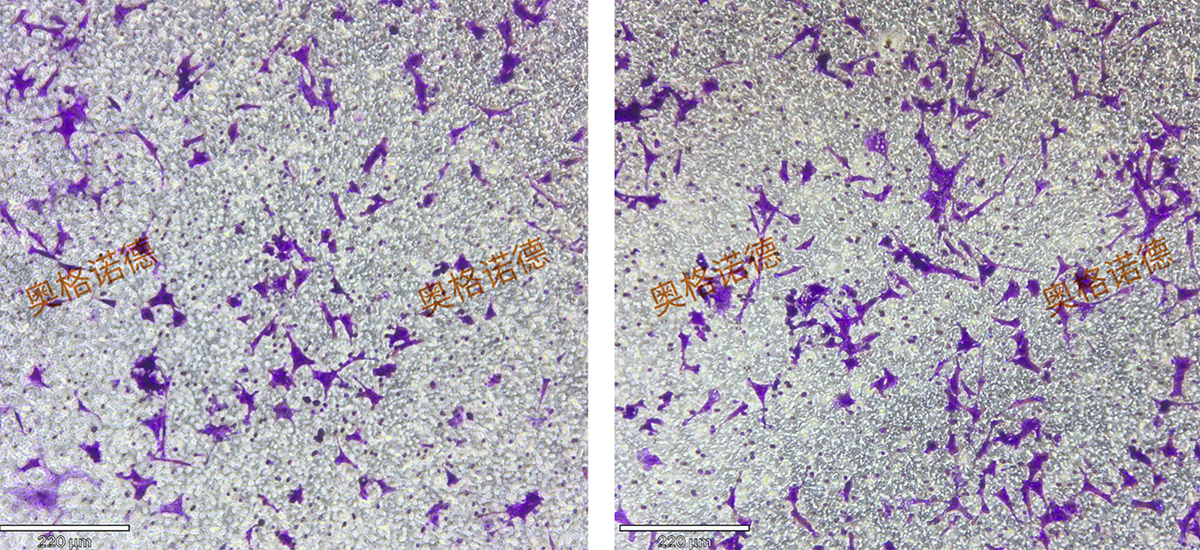
Cell invasion assay is an experimental technique that simulates the ability of cells to actively break through physical barriers and transfer positions in vitro. It is widely used in various cell invasion and transfer ability exploration studies. Combined with crystal violet staining, quantitative analysis can be achieved. It is used in research fields such as inflammatory response, cancer metastasis, embryonic development, angiogenesis, wound healing, immune response, and atherosclerosis.
2.2 Experimental steps
2.2.1 Matrigel dilution: After the matrigel is thawed, dilute the matrigel with serum-free culture medium to about 1 mg/ml, mix well, and place on ice for later use.
2.2.2 Chamber gel: Add the diluted matrigel vertically to the bottom of the pre-cooled chamber according to the amount of 60 μl per chamber, do not generate bubbles, and then place it in a 37℃ cell culture incubator for 2-3 hours to allow the matrigel to fully polymerize into a thin film layer.
2.2.3 Hydration of basement membrane: After incubation, carefully remove excess liquid in the chamber, add 100μl serum-free culture medium, and then place in a 37℃ cell culture incubator for 30 minutes to fully hydrate the basement membrane.
2.2.4 Leakage detection: Carefully aspirate the liquid in the chamber and check whether there is liquid passing through the chamber into the lower chamber. If there is leakage, it can be used for downstream cell inoculation.
2.2.5 Cell preparation: Digest the cells that are expected to be tested in logarithmic growth, resuspend and count the cells after washing, and adjust the cell concentration to 1-10E+5cell/ml (adjust the cell density according to the migration ability of the cells to be tested); add 600μl of culture medium containing 5%-10% FBS or chemokines to the lower chamber of the 24-well plate, then use tweezers to place the Transwell chamber in the 24-well plate, take an appropriate amount of cell suspension (100-200μl) and add it to the upper chamber, and finally place it in the incubator for 12-48h (the amount of cells and time depend on the changes in cell invasion ability, combined with preliminary experiments to determine); set up control wells at the same time, and add an equal volume of serum-free culture medium to the lower chamber.
2.2.6 Fixation: At the specified time point, remove the Transwell chamber, remove the culture medium, and gently wipe the matrix gel and cells in the chamber with a cotton swab or cotton soaked in PBS. Add 600µl of 4% paraformaldehyde fixative to the clean wells of the 24-well plate and place the chamber in fixation for 30min. Then discard the fixative solution and wash the inside and outside of the chamber once with PBS.
2.2.7 Crystal violet staining: Add 600μl crystal violet staining solution to the clean wells of the 24-well plate and place the chamber in the staining for 10 minutes.
2.2.8 Take out the chamber and wash the inside and outside of the chamber with PBS 3 times. After proper air drying, observe the qualitative study under the microscope; take 3-5 fields of view and take pictures.
2.2.9 Quantitative analysis: Use Image J to count and take the average value for quantitative research.
2.3 Notes
2.3.1 Choose a suitable Transwell chamber according to the cell size. The commonly used one is 8μm pore size. The cell culture plates include 6-, 12- and 24-well plates, and the most commonly used one is the 24-well plate.
2.3.2 The inoculated cell state and density are very critical. The inoculation quantity and subsequent detection of fixation and staining time points need to be determined in combination with preliminary experiments.
2.4 Example of results
3. Xenograft
3.1 Experimental purpose
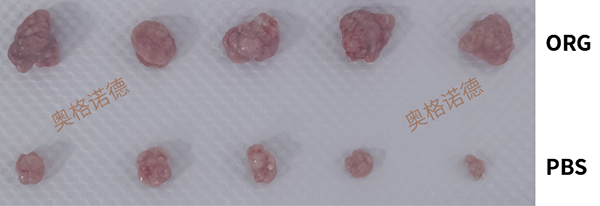
The subcutaneous tumorigenesis experiment lays the foundation for the disease model for the study of tumor occurrence and development and the development of tumor drugs, and is widely used in the study of various tumor pathogenesis. High-concentration matrix gel effectively promotes tumor formation and provides a suitable growth microenvironment for tumor cells.
3.2 Experimental steps
3.2.1 Select cells in the logarithmic growth phase, and the cell confluence should be about 80-90%;
3.2.2 After digesting the cells, wash them twice with pre-cooled PBS to remove the residual serum and trypsin in the cells.
3.2.3 Resuspend the cells with pre-cooled PBS or serum-free culture, count and adjust the cell density according to needs. Mix the cell suspension with high-concentration matrix gel at a ratio of 1:1. Generally, the amount of cells inoculated with subcutaneous tumors is 1-5×10^6 cells/mouse, and the inoculation volume is 0.1-0.2ml.
3.2.4 The nude mice were 4-6 weeks old and weighed about 16-18g. The implantation site was selected in an area with rich blood supply, such as the middle and rear part of the armpit;
3.2.5 Puncture about 1cm forward from the needle insertion site for subcutaneous injection. The needle slid left and right under the skin several times so that the cells could be inoculated into a cluster to avoid the cell suspension from overflowing from the needle hole after injection;
3.2.6 After inoculation, the mice were raised normally and tumors were formed in 4-6 weeks. The weight of the mice and the changes in tumor volume were detected during the process; finally, the tumors were taken for imaging and the tissues were preserved for downstream experimental testing.
3.3 Precautions
3.3.1 After the cells and matrix gel were mixed, they needed to be placed on ice and injected as soon as possible to avoid matrix gel polymerization; at the same time, low temperature can reduce cell metabolism and maintain cell viability.
3.3.2 Different cells have different tumor-forming abilities, so the number of cells to be inoculated needs to be combined with preliminary experiments to determine the optimal value.
3.3.3 The concentration of matrix gel after dilution should not be lower than 4mg/ml.
3.4 Example of results
4. Matrigel Plug Assay
4.1 Experimental Purpose
The Matrigel Plug Assay is a technique for exploring angiogenesis in vivo. It can be used to analyze genes, small molecules or signal pathways that regulate angiogenesis. Combined with pathological staining experiments, it can achieve qualitative and quantitative detection of angiogenesis.
4.2 Experimental Steps
4.2.1 Take out the Ogenord high-concentration Matrigel from the -20℃ refrigerator, half bury it in crushed ice, and place it in a 4℃ refrigerator to thaw overnight.
4.2.2 Pre-cool the EP tube, syringe, needle, pipette, etc. at 4℃ or on ice to avoid premature polymerization of the gel during subsequent Matrigel operations.
4.2.3 Transfer 500μl of high-concentration Matrigel to a 1.5ml EP tube, add the drug to be tested (small molecule compounds and proteins, etc.), mix well and place on ice.
4.2.4 Anesthetize the mouse (inject Avertin or other inhalation anesthesia). After anesthesia, shave the hair on one side of the mouse body to be injected with a razor, wipe with alcohol cotton for disinfection and set aside.
4.2.5 Perform subcutaneous injection at the prepared skin. Remember not to inject too fast and push the drug slowly; 7-15 days after injection, the matrix gel plug is formed and vascularized.
4.2.6 After the angiogenesis experiment, anesthetize and kill the mouse, remove the matrix gel plug, place it in DMEM, remove other tissues adhering to the surface of the matrix gel plug, and then wash it again in PBS.
4.2.7 Image acquisition and sample preservation: After cleaning, take pictures and save them. The redness of the gel plug represents the level of angiogenesis; after the sample is preserved, it can be used for pathological staining to analyze the tissue morphology of vascularization.
4.3 Result example
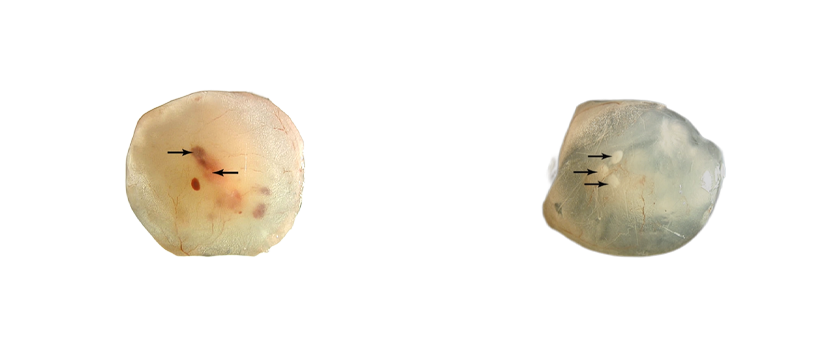
Akhtar N, Dickerson EB, Auerbach R. The sponge/Matrigel angiogenesis assay[J]. Angiogenesis, 2002, 5: 75-80.
5. Organoids
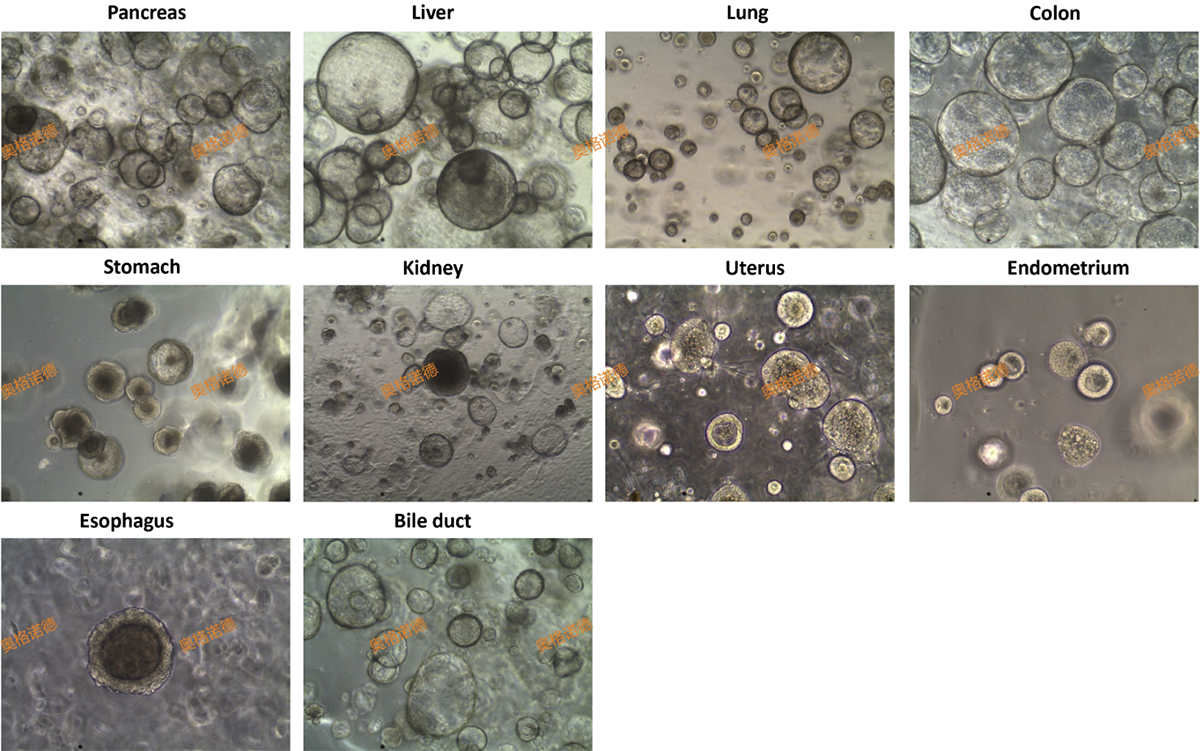
Organoid-specific matrix gel for normal mouse organoid culture
6. Stem cell culture
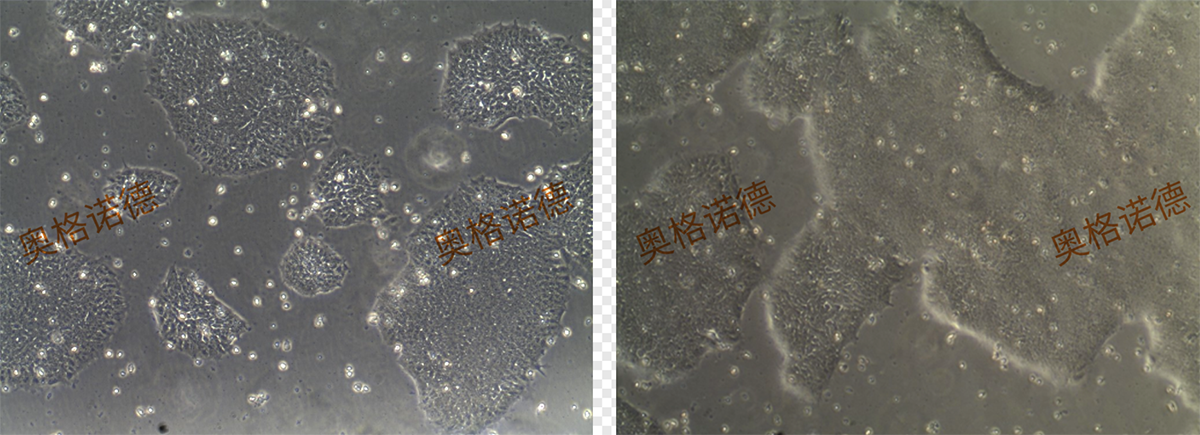
OGNODE stem cell-specific matrix gel for iPS cell culture